

More resources can be found at Kaltura’s official website:
- Kaltura Personal Capture Overview
- Getting Started with Kaltura Personal Capture
- Kaltura Personal Capture – Recording Options
- Kaltura Personal Capture – Completing and Uploading Your Recording
- Kaltura Personal Capture – User Guide
NOTE: Please notify us via email when you have completed and uploaded your lecture (video@cop.ufl.edu) and include your lecture title and the course in which it should appear.
Step 1
Open a web browser and navigate to https://media.ahc.ufl.edu.
Step 2
Click on the “Guest” link in the top-right corner of the page, then click “Login” and log in with your GatorLink credentials.
Step 3
After logging in, click on “+ Add New” and select “Kaltura Capture” from the dropdown list.
Note: If you do not see “+ Add New” please email us at video@cop.ufl.edu to grant you access.

Step 4
If you have not already, download the program for your computer operating system and follow the installation instructions. If you have already downloaded and installed the software, it will open automatically.
Step 5
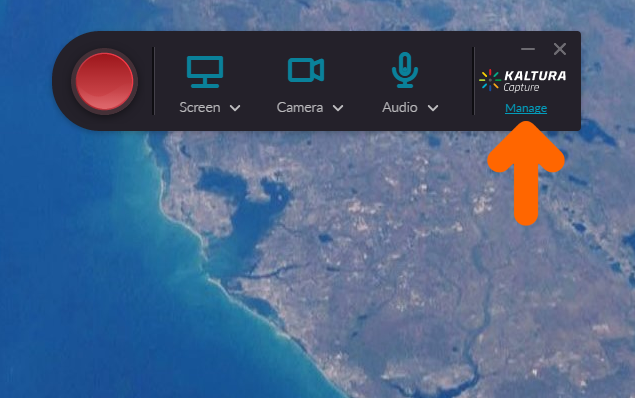
When Kaltura Capture opens, you will see a large red record button as well as dropdown menus for selecting the screen you’d like to record and the webcam and the microphone you’d like to use. You can disable any of these inputs by clicking on the icons themselves.
NOTE: If you have a computer with more than one monitor, make sure that the screen selected for recording is the one that will have the full presentation window, not the “Presenter View” with notes and presentation controls.
The “Manage” link will open up a menu where you can view your previously recorded lectures, adjust recording settings, and view your installation details.
Step 6
When you’re ready to record, click the large red record button, start your PowerPoint Presentation, and give your lecture. Any annotations you make on the slides in PowerPoint using the pen or brush tool will be recorded as well.
Step 7
When you’re finished recording, exit PowerPoint and click the square gray “stop” button.
NOTE: You can also pause the recording with the red pause button, or cancel it altogether with the gray X. The microphone icon will mute and unmute your microphone, and the pencil icon opens up annotation tools.)

Step 8
After you stop recording, enter your lecture title in the “Lecture” field, your name in the “Description” field, and the PHA number for the course in the “Tags” field. Then click Save & Upload.
NOTE: Please notify us via email when you have completed and uploaded your lecture (video@cop.ufl.edu) and include your lecture title and the course in which it should appear.
